在上一步里,我们已经购买好了域名,现在我们要做的就是服务器VPS的购买,安装和配置服务器并安装好WordPress. 从而使我们建网站的最重要一步可以跨出去。
准备VPS, 选择webinoly支持的Ubuntu 24.04
在上一步,已经注册了Digitalocean的60天$200额度的免费账户。没有注册的,从下面的链接去注册。新手要的就是白嫖。谁还花大钱去学习。

上面的链接可以在60天内可以获得$200的免费使用金额。特别适合新手去学习用。
购买VPS
登陆DigitalOcean后,可以看到网站右上角有一个Create,下拉菜单里点击Droplets. 我一直不理解,这个到底是什么意思。单数是小的液滴的意思。复数难道很多水滴?不管怎么样,点击这里就可以。

然后就会开始选服务器的一些配置。我一般会选San Fransisco, 在美国西部。离我们会比较近。当然你可以用反向的思维。就是这个地,中国用户选得比较多。所以可以选New York。 这个随您。然后主要的在下面的选项里。

选择OS,一定要选择 Ubuntu, 因为我前一步里说过,我们要用Webinoly去搭建Wordpress的配置环境。而要求就是Ubuntu.
Version,选24.04(LTS)x64. 这也是Webinoly里的要求,可以选24.04和22.04, 我们当然选较新的。
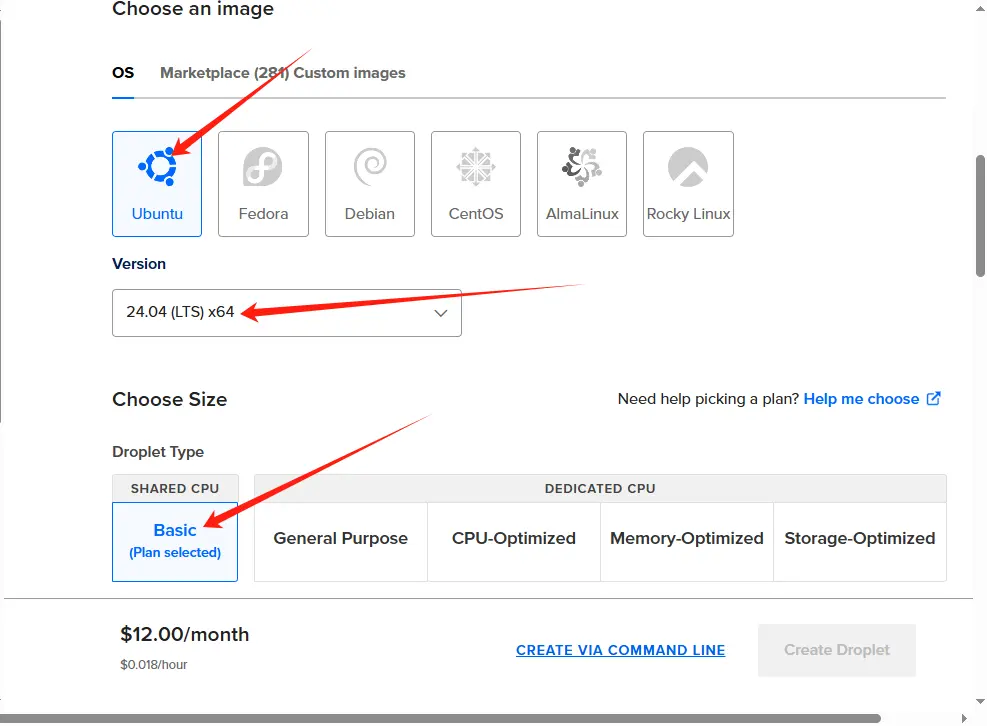
Droplet Type: 用Basic就可以了, CPU Options我们也用较便宜的 Regular,然后我们选2GB/1CPU, $12/月的。等60天以后想保留这个网站,也是对支付得起的范围。

不需要选择备份服务器的,我们一般会设置备份网站的内容就可以。一开始也不选择密钥的方式,而是选用密码的方式。因为我们还要设置root账户禁用。密钥也要对非root账户进行设置。

在Hostname里加上域名

然后点击create Droplet,就会创建好了。

VPS的基本安全设置
SSH登陆VPS
要设置前我们需要ssh登陆vps, 现在windows的命令提示符就可以直接ssh登陆。以前windows里需要安装putty或者类似的ssh登陆的工具。mac里的Terminal可以。
连接以后会让你输入密码,就是你购买vps里的root的密码,输入时是不显示*这些符号的。只管输,错了是连不上的。
连接以后会出来一些vps的信息,像下面显示的。
abe@Abes-MBP:~$ ssh root@123.123.123.123
Welcome to Ubuntu 24.04 LTS (GNU/Linux 6.8.0-36-generic x86_64)

 * Documentation:  https://help.ubuntu.com
 * Management:     https://landscape.canonical.com
 * Support:        https://ubuntu.com/pro

 System information as of Thu Jun 27 12:26:22 EDT 2024

  System load:  0.0               Processes:             110
  Usage of /:   3.9% of 47.39GB   Users logged in:       1
  Memory usage: 10%               IPv4 address for eth0: 104.236.70.190
  Swap usage:   0%                IPv4 address for eth0: 10.17.0.5

Expanded Security Maintenance for Applications is not enabled.

17 updates can be applied immediately.
13 of these updates are standard security updates.
To see these additional updates run: apt list --upgradable

Enable ESM Apps to receive additional future security updates.
See https://ubuntu.com/esm or run: sudo pro status
设置服务器名
这一步不是必须的。因为每次要ssh连接服务器,就要查看ip去输入。而ip往往不容易记住。
更新服务器
先更新里面的软件版本
然后我们安装软件更新
这里用apt dist-upgrade替代apt upgrade,因为在一个博客里说,这个可以自动处理软件的依赖关系。会展示给你软件的更新,多少硬盘空间被使用等等。
更新后会显示哪些软件更新了,哪些软件系统不再支持等。可以使用下面命令行去删除不再更新的过时的版本软件
在更新过程中出现一些紫色框框时,不要更改选项,用Tab键可以直接选中OK,然后回车。更新完以后会显示以下
Pending kernel upgrade!
Running kernel version:
  6.8.0-51-generic
Diagnostics:
  The currently running kernel version is not the expected kernel version 6.8.0-55-generic.

Restarting the system to load the new kernel will not be handled automatically, so you should consider rebooting.

Restarting services...
 systemctl restart cron.service multipathd.service udisks2.service

Service restarts being deferred:
 /etc/needrestart/restart.d/dbus.service
 systemctl restart getty@tty1.service
 systemctl restart serial-getty@ttyS0.service
 systemctl restart systemd-logind.service
 systemctl restart unattended-upgrades.service

No containers need to be restarted.

User sessions running outdated binaries:
 root @ session #3: apt[2292], bash[1983], sshd[1837]
 root @ user manager service: systemd[1848]

No VM guests are running outdated hypervisor (qemu) binaries on this host.
这个时候,最好可以重启一下。
设置自动安全更新
服务器的系统会有很多安全更新补丁,我们不可能时常关注服务器的软件更新,我们可以通过设置,让安全方面的更新可以自动进行。同时我们不应该把所有软件进行自动更新,因为一些软件版本间会有差异,自动更新会让wordpress无法运行。因此我们只设置安全更新自动进行。
重新SSH登陆
安装 unattended-upgrade 包,无人值守更新包。
创建和设置无人值守更新的配置文件
然后你会看到类似以下的屏幕
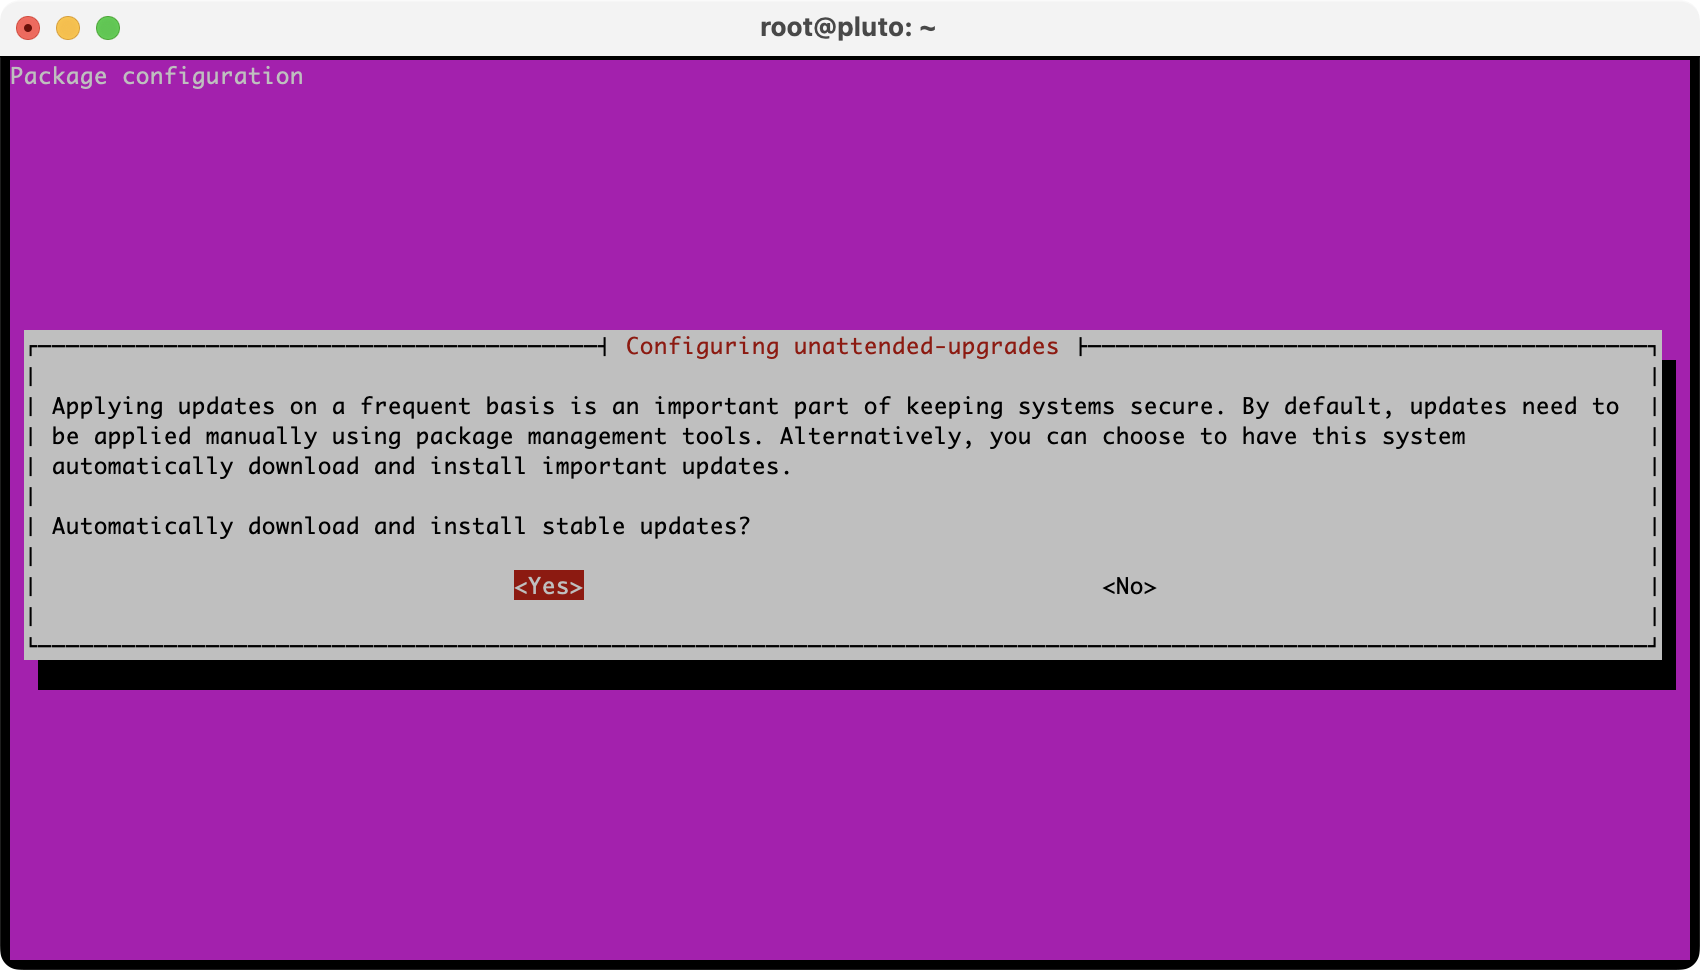
用tab键可以选择Yes或者No. 这里是选Yes,回车
然后我们可以找到配置文件,去更改一下设置
只保留安全更新
// Automatically upgrade packages from these (origin:archive) pairs
//
// Note that in Ubuntu security updates may pull in new dependencies
// from non-security sources (e.g. chromium). By allowing the release
// pocket these get automatically pulled in.
Unattended-Upgrade::Allowed-Origins {
            "${distro_id}:${distro_codename}";
            "${distro_id}:${distro_codename}-security";
            // Extended Security Maintenance; doesn't necessarily exist for
            // every release and this system may not have it installed, but if
            // available, the policy for updates is such that unattended-upgrades
            // should also install from here by default.
            "${distro_id}ESMApps:${distro_codename}-apps-security";
            "${distro_id}ESM:${distro_codename}-infra-security";
//          "${distro_id}:${distro_codename}-updates";
//          "${distro_id}:${distro_codename}-proposed";
//          "${distro_id}:${distro_codename}-backports";
};
然后 CTRL + X,再Y 回车保存
默认更新就自动重启,但是这个会对我们的在设置服务器或者更新网站内容时造成问题,所以我们把更新后重启给关闭,去手动重启。或者也可以设置为定时。这个时间和服务器的时区设置有关。因为webinoly可以设置时区,所以在这个前面我没有设置时区。所以大概了解时区的时间。
上面这个是关闭自动重启
// Remove unused automatically installed kernel-related packages
// (kernel images, kernel headers and kernel version locked tools).
//Unattended-Upgrade::Remove-Unused-Kernel-Packages "true";

// Do automatic removal of newly unused dependencies after the upgrade
//Unattended-Upgrade::Remove-New-Unused-Dependencies "true";

// Do automatic removal of unused packages after the upgrade
// (equivalent to apt-get autoremove)
//Unattended-Upgrade::Remove-Unused-Dependencies "false";

// Automatically reboot *WITHOUT CONFIRMATION* if
//  the file /var/run/reboot-required is found after the upgrade
Unattended-Upgrade::Automatic-Reboot "04:00";

// Automatically reboot even if there are users currently logged in
// when Unattended-Upgrade::Automatic-Reboot is set to true
//Unattended-Upgrade::Automatic-Reboot-WithUsers "true";

// If automatic reboot is enabled and needed, reboot at the specific
// time instead of immediately
//  Default: "now"
//Unattended-Upgrade::Automatic-Reboot-Time "02:00";

// Use apt bandwidth limit feature, this example limits the download
// speed to 70kb/sec
上面是定时完成更新后的当天4点重启服务器。并不是每天重启的意思。这个需要了解。
默认下nginx, php, mysql等等都会自动重启的。
然后我们要设置查看是否有更新的频率。这个也需要更改配置文件
找到并设置
1表示每天更新一次,15天更新一次就设置为“15”。这个不用设置得过于频繁。我一般设置为15天左右。
设置一个新的用户,用于替换掉root用户。
大家都知道,黑客太多了。当你的服务器安装好的一刻,其实所有人都可以访问你的服务器了。这个时候一些已知的用户名,加上一个暴力的密码攻击就已经开始了。所以我们要做的是把常见的用户的访问禁止掉。那我们还要用自己的用户名和密码去登陆。甚至我们会取消密码登陆,而用密钥的方式。
首先我们建新的用户, 用 户名自己随便起,我这里为了方便就取parkerquickcouplings
然后会出现一系列的设置过程
root@pluto:~# adduser parkerquickcouplings
Adding user `parkerquickcouplings' ...
Adding new group `parkerquickcouplings' (1000) ...
Adding new user `parkerquickcouplings' (1000) with group `parkerquickcouplings' ...
Creating home directory `/home/parkerquickcouplings' ...
Copying files from `/etc/skel' ...
New password:
Retype new password:
passwd: password updated successfully
Changing the user information for parkerquickcouplings
Enter the new value, or press ENTER for the default
    Full Name []: parkerquickcouplings
    Room Number []:
    Work Phone []:
    Home Phone []:
    Other []:
Is the information correct? [Y/n]
然后把新的用户parkerquickcouplings加入到 sudo group里,使我们可以用 sudo +命令行,来行使root的权限。 比如 sudo apt update来替代root登陆下的apt update命令行。
然后我们可以退出后,再用新的用户去SSH登陆
 * Management:     https://landscape.canonical.com
 * Support:        https://ubuntu.com/pro

 System information as of Sat Mar 15 09:38:12 UTC 2025

  System load:  0.24              Processes:             98
  Usage of /:   4.3% of 47.39GB   Users logged in:       0
  Memory usage: 8%                IPv4 address for eth0: 137.184.181.137
  Swap usage:   0%                IPv4 address for eth0: 10.48.0.7

Expanded Security Maintenance for Applications is not enabled.

0 updates can be applied immediately.

Enable ESM Apps to receive additional future security updates.
See https://ubuntu.com/esm or run: sudo pro status


The programs included with the Ubuntu system are free software;
the exact distribution terms for each program are described in the
individual files in /usr/share/doc/*/copyright.

Ubuntu comes with ABSOLUTELY NO WARRANTY, to the extent permitted by
applicable law.

To run a command as administrator (user "root"), use "sudo <command>".
See "man sudo_root" for details.

parkerquickcouplings@parkerquickcouplings:~$
这里我们还是用密码登陆,因为在不同的设备下用ssh登陆会方便一些。如果要更安全一些,可以使用密钥的方式。这里我们跳过密钥登陆的方式。
禁止root账户SSH连接
为了安全,在我们设置了新的账户登陆以后,我们会禁止root账户SSH连接
我们需要找到找到禁止root账户用来SSH登陆的位置,可以用Ctrl +W来调出搜索框,然后输入PermitRootLogin回来,就能打到这个位置。
上面的配置文件里找到 PermitRootLogin yes, 把它更改成 PermitRootLogin no 。然后Ctrl +x, 输入Y,回车保存。然后我们需要重启SSH服务
这样我们就把服务器的一些安全措施做了设置。如果上面设置了密钥登陆,我们还会做一步禁止密码登陆。这里我们就没有设置。把密码尽量复杂一些也是可以的。
安装Webinoly的快速安装网站
服务器配置好以后,我们就可以安装webinoly和快速安装网站。
上面的命令行是下载和安装wordpress的环境和配置,你就会看到在自动跑命令行安装。看到以下内容就安装完成了。
******            INSTALLATION HAS FINISHED SUCCESSFULLY              ******
****************************************************************************
********       MySQL/MariaDB properly configured and secured!       ********
************         Passwords no longer displayed here.        ************
****************************************************************************
For passwords, read: https://webinoly.com/documentation/webinolys/#dbdata

Verifying integrity of the entire Webinoly system...


Don't like our defaults? Every part of Webinoly is overridable!
- - - - - - - - - - - - - - - - - - - - - - - - - - - - - - - - -
Please, read the documentation: https://webinoly.com/documentation/
Be sure your firewall ports are correctly set: https://webinoly.com/install/
Configuration file is here: /opt/webinoly/webinoly.conf

Nginx, PHP, MySQL (MariaDB) and some other useful tools have been installed successfully!

****************************************************************************
*************************     WEBINOLY PREMIUM     *************************
*****    Become a Sponsor now and be part of our Premium Community!    *****
****************************************************************************
*************     Bitcoin: 1E3Ybo5UcvaAr1MoK4nBnMRFFY9aEMiku3     **********
*******   GitHub Sponsors: https://github.com/sponsors/QROkes     **********
***************    PayPal: https://www.paypal.me/qrokes     ****************
****************************************************************************
**********       Help me keep this project moving forward.       ***********
****************************************************************************
可以看webinoly关于安装的说明 https://webinoly.com/install/, 还可以用不同的命令去安装不同的环境,比如只运行html的静态文本的,只需要安装nginx就可以, 运行php的环境等等。这边只用来安装wordpress.
安装wordpress前的工作
因为服务器由webinoly配置,但是我们还没有把域名指向这个服务器。所以我们现在需要把域名的一个CNAME记录和一个A记录指向这个服务器。打开cloudflare

添加记录,我们先添加一个A记录

要把代理状态关掉,这个和Cloudflare的CDN有关。 再加一个CNAME,是把www.parkerquickcouplings指向parkerquickcouplings.com. 因为www是子域名,实际上,google会认为这是两个网站,所以要把www这个变成主域名的别名。这个跟SEO有很大关系。

等添加完域名的记录,我们就完成了域名的指向。然后我们安装wordpress
这里 -wp表示是wordpress网站, -cache=on表示开启缓存。 webinoly和我们自己设置的服务器类似,也是用redis来完成object Cache,用FastCGI 来完成Page Cache. 所以我们会很熟悉。然后我们会开启SSL, 这个还是我们熟悉的letsencrypt. 这里不用我们去设置robot. webinoly已经帮你设置了脚本和环境。
这里我们是新网站,我们就直接用域名建站了。如果我们是有网站大改版本时,我们会先建一个dev.parkerquickcouplings.com, 这种过渡的网站在新的服务器。然后等新站在dev版本完全更新好,才把复制成主站,parkerquickcouplings.com。这样就很方便。
webinoly还有一个比较好的功能,就是保护wp-admin文件夹。当然你也可以设置保护其他路径。这个是因为默认的wordpress登陆页面路径是wp-admin, 这样还是会有黑客用暴力破解。特别是一些新手会把用户名一直在发表文章。然后对于黑客只是密码的问题。
根据提示,可以创建一个保护登陆页面的账户和密码。
另外要开始网站SFTP的权限
然后我们就可以在浏览里去配置wordpress安装了。输入刚才httpauth里设置的账户密码就可以开始安装Wordpress了。

填进去相应的信息,就可以完成安装Wordpress. 我们一般先要把搜索引擎收录功能关闭,不建议google收录。因为网站的基本内容还没有建好。

如果是dev版,建好以后,我们就可以把dev.example.com直接复制到example.com。只需要把域名指向服务器改完,然后就可以转移完成
给example.com申请上SSL.
好多网站习惯加www,那我们可以把example.com跳转到www.example.com
然后就可以访问www.example.com去查看。这时候www.example.com网站已经完成了。因为已经在dev.example.com时完成了基本的编辑,这时候我们只需要做一些优化的工作,就可以完成网站的搭建了。
这就安装好了Wordpress. 后面可能需要视频讲更具体一些。我以前的博客都是记一点技术点的。录视频是个难事。得试试看了。
发表回复